A few thingz
Joseph Basquin
31/07/2026
A la recherche d'un rendu de parquet chêne (16 ans plus tard...)
Lorsque j'habitais Nancy il y a 16 ans, en visitant divers apparts à louer (en passant : l'architecture des apparts début XXème est incroyablement belle à Nancy), j'ai vu ce parquet chêne massif :
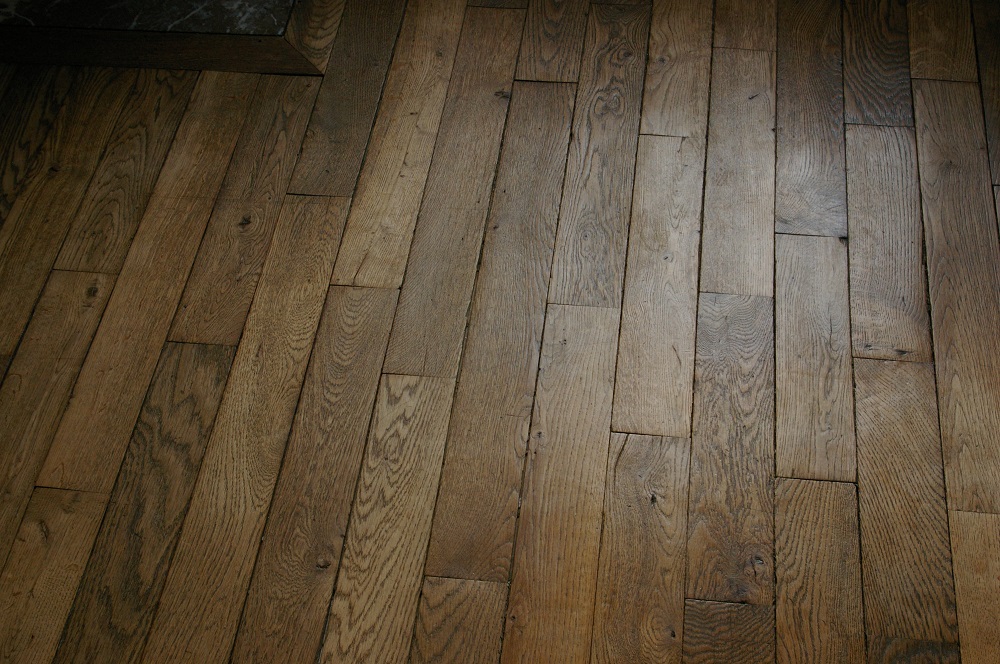
Depuis je ne cesse d'y repenser, et j'ai recherché cela dans mes appartements succesifs. Actuellement en rénovation de maison, où un parquet chêne va prochainement être poncé, je vais tout naturellement chercher à reproduire cet effet.
Mais beaucoup d'obstacles se présentent :
-
Théories défaitistes “Ce rendu n'est possible qu'avec la patine du temps, donc impossible à avoir sur un parquet fraichement reponcé” => ok, mais je vais essayer quand même !
-
Il y a mille solutions possibles pour le choix de produit : vernis, vitrificateur (avec toutes ses déclinaisons : mat, semi-satiné... / incolore, teinté... diverses marques: V33, etc.), fond dur, huile de lin, cire... Donc mille possibilités d'être déçu et de n'avoir pas exactement le rendu souhaité. Un soupçon trop orangé ou rougeoyant et, je le sais, je serai mécontent d'être passé à côté de ce que je cherchais.
- J'ai parcouru une quantité d'articles ou tutos sur internet, mais aucun ne donnait exactement ce résultat : il faut l'avouer, le rendu n'est souvent que très moyen, même avec du parquet massif très onéreux (exemple : ce parquet chêne neuf : on ne retrouve aucunement le charme des parquets anciens, d'une part à cause de la teinte, et d'autre part car la trop grande perfection de coupe et le fait qu'il n'y ait aucun espace entre les lames donne presque l'impression d'un parquet plastifié !)
Par ailleurs les recherches Google sur le sujet mènent à des quantités de produits de boutiques en ligne, avec des noms enchanteurs du type "Vitrificateur patine ancienne effet vieilli", mais au final il est impossible de tout tester (il faudrait acheter des dizaines de produits), ni de les comparer entre eux car la composition des produits n'est pas indiquée (en informatique on dirait : pas open source !).
Par ailleurs, des tutos Youtube montrent des astuces pour teinter le bois avec des sachets de thé ou un mélange vinaigre+paille de fer. Certes. Cela marche peut-être. Mais raisonnablement, utilisaient-ils cela à grande échelle dans les années 1910 lorsqu'étaient posés des parquets dans des centaines de mètres carrés d'appartements ? A coup de dizaines de kilogrammes de thé ou de litres de mélange vinaigre + paille de fer ? J'en doute. (Si vous avez des infos, je suis preneur)
Reprenons : ce parquet que j'aimais tant dans ce vieil appartement a sans doute été teinté début XXème siècle, donc tant qu'à faire, autant chercher dans des produits disponibles à l'époque. Exit donc les vitrificateurs modernes, etc. Ce qui limite le choix. Mais quelle recette précise utilisaient-ils à l'époque ? Idée : pourquoi ne pas utiliser Gallica, fonds documentaire numérisé de la Bibliothèque Nationale de France ?
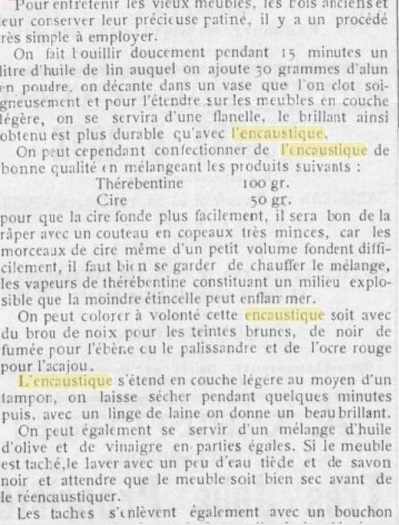
Et je finis par trouver cela dans La Revue de l'habitation, Ma petite maison, (Paris), 1908 :
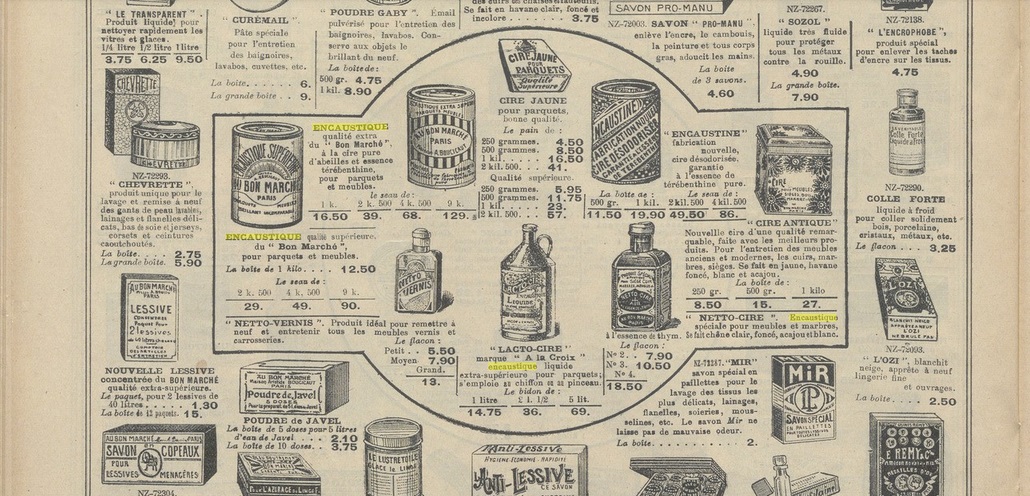
Egalement ici, dans Au Bon Marché, Catalogue. Ménage, orfèvrerie, services de table, articles de jardin, outillage, entretien, 1926 :

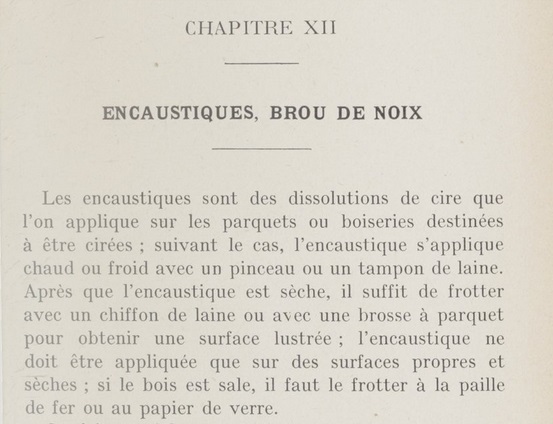
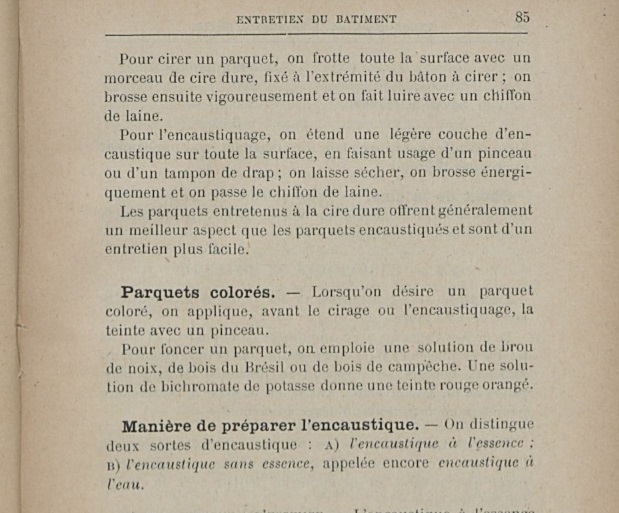
Par ailleurs, dans Nouvelle encyclopédie pratique du bâtiment et de l'habitation. Volume 9, René Champly :
Extrait 1 : CHAPITRE XII ENCAUSTIQUES, BROU DE NOIX Les encaustiques sont des dissolutions de cire que l'on applique sur les parquets ou boiseries destinées à être cirées(...)Après que l'encaustique est sèche, il suffit de frotter avec un chiffon de laine ou avec une brosse à parquet pour obtenir une surface lustrée(...)l'encaustique ne doit être appliquée que sur des surfaces propres et sèches(...)
Et également dans Technologie de l'employé d'hôtel / par A. Fabre, E. Guiard, 1921-1926:
Voilà la solution !
- Encaustique = mélange cire d'abeille + essence de thérébentine (classique à l'époque)
- Teinte au brou de noix (classique à l'époque)
Après quelques tests (photos à venir un jour) concernant le dosage respectif des constituants, j'arrive enfin à trouver le résultat espéré.
PROBLEM SOLVED, 16 YEARS LATER !
Voici la règle que je viens de formaliser après 40 ans (mais que j'applique inconsciemment depuis longtemps) :
“Quand on veut un résultat précis, avec une attention particulière au détail, rien ne sert de chercher un produit "on the shelf" ("disponible sur étagère" en magasin) pour le faire : cela ne conduira qu'à des déceptions, de n'avoir au final pas exactement le rendu recherché. Au lieu de cela, il faut tout simplement fabriquer le produit soi-même !”
(et au préalable : chercher les constituants de base les plus simples possibles, puis expérimenter)
About me: I am Joseph Basquin, maths PhD. I create products such as SamplerBox, YellowNoiseAudio, Jeux d'orgues, this blogging engine...
I do freelancing: Software product design / Python / R&D / Automation / Embedded / Audio / Data / UX / MVP. Send me an email.
The Content Overflow Era – the end of the Long Tail?
What follows might be trivial by now, but it is always good to put a word on it. I'm speaking about media content in general: books, music, website articles, soon videos, and so on.
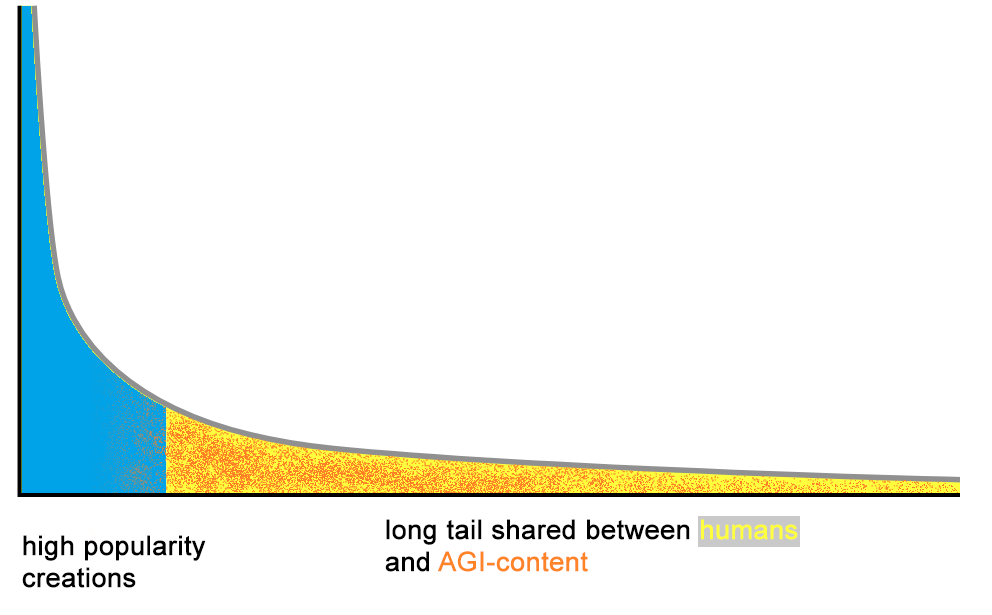
Here is what the "Long Tail" is now evolving into (see Period #2 if you're unfamiliar):
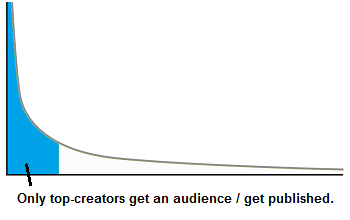
Period #1 – Pre-Internet era
Limited published content, for at least these reasons:
- fewer creators because complexity to create (e.g. access to a recording studio is expensive in the pre-home-studio era)
- curation done by editing/publishing companies is a heavy barrier for creators
- physical limitations: storage isn't infinite in book/music shops, worldwide access to content is complex because requires physical shipping
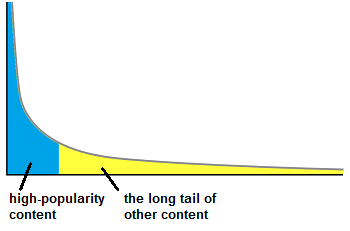
Period #2 – The Long Tail 2000-2022
The Long Tail concept has been popularized by Chris Anderson (2004, 2006). Notable aspects:
- easier means of creation (e.g. affordable home studios)
- no more physical limitation : nearly infinite digital storage for online platforms, easy worldwide access without physical shipping (internet)
Consequence: at this period in time, it was possible for a human producing original content (that arrived in the long tail) to exist as creator, to get its content read/listened to, by other humans. This also led to economic viability of niche products for (some) creators.
Period #3 – Content Overflow 2022-?
- illimited creation by bots (AI-generated websites for SEO purposes, AI-generated music on Deezer)
- curation-less "automated" platforms/search-engines become less relevant:
- on tech discussion channels, everyone complains about Google's decreasing capacity to find relevant results (flood of SEO-content)
- if no change, Spotify might become similarly uninteresting. See also Deezer Says 10,000+ AI Tracks Are Being Uploaded Daily.
Consequence for small creators: Humans creating content, but which are not in the top celebrities, will have increasing difficulties to get their content read/listened to by other humans, because they will be in the same too-long tail than AI-generated content.
Possible outcomes
-
human small creators not able anymore to get an audience? (can't compete with flood of AGI)
-
decrease of interest for curation-less platforms (Google, Spotify, ...) and rise of human-curated platforms (Reddit + new ones)?
- or, alternatively, 90% of people don't really care and will indistinguishably consume AI-generated or human-generated content on big platforms (acceptation of lower standards), so no major change for platforms
About me: I am Joseph Basquin, maths PhD. I create products such as SamplerBox, YellowNoiseAudio, Jeux d'orgues, this blogging engine...
I do freelancing: Software product design / Python / R&D / Automation / Embedded / Audio / Data / UX / MVP. Send me an email.
The best browser bookmarking system is already built-in
(Thanks for getting this on front page of HackerNews!)
Along the years I have tested various browser bookmarking systems.
And for 10 years, I've realised that the best bookmarking system is already built-in to most browsers (Firefox, Chrome), and that is:
files!
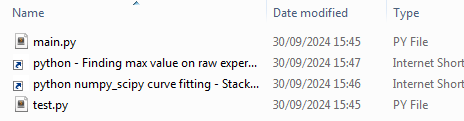
See the video, the drag-and-drop creates a .url shortcut file:
Just that. You drag and drop the URL to the Desktop or any folder.
No browser extension needed.
-
Want to delete/copy/move/rename a bookmark? Just delete/copy/move/rename the file.
-
Want to organize your bookmarks? Use directories in your filesystem, as usual.
-
Want to join the bookmark to a work-in-progress in its dedicated directory? Just copy the file there, you'll have the bookmarks grouped with your other files:
-
Want to backup all your bookmarks? They are just
.urlfiles in folders, so you can do a backup with all your other documents. -
Want to sync them with other devices? Use the same sync system as your other documents (Syncthing is great).
-
Want to use your bookmarks in multiple browsers? No problem, you just drag and drop the bookmark file into the browser, and it opens automatically.
-
Want to change your main browser? No need to do anything, you just keep the bookmark files (no need to "export" anything, no need to install a browser extension to save the bookmarks and/or convert them to another format...).
-
Want to search among your thousands of bookmarks? Just use your OS's search among all .url files.
-
Want to add tags to your bookmarks? Just rename the file
Super bookmarking system.urlintoSuper bookmarking system #productivity.urland later you can search your bookmarks with tags, example query in your favorite OS's file search tool: "bookmarking #productivity". -
Want to do some data mining on your thousands of bookmarks? You can do it with any programming language, since a
.urlfile is just that:[InternetShortcut] URL=https://www.afewthingz.com/browserbookmark
That's it! Probably the best bookmark manager ever.
This has worked for decades with Firefox, Chrome, Internet Explorer, and probably others, at least on Windows.
Remarks:
-
sadly, it doesn't work out of the box on Ubuntu + Firefox. Mozilla, please fix this :)
- There has been a regression about this in recent versions of Firefox on Windows, you now have to modify your default Firefox shortcut to
firefox.exe -no-deelevate. Please Mozilla, don't let this awesome feature die, this should work out of the box. It works on Chrome.
About me: I am Joseph Basquin, maths PhD. I create products such as SamplerBox, YellowNoiseAudio, Jeux d'orgues, this blogging engine, etc. I do freelancing (remote ok): Python expert / R&D / Automation / Embedded / Audio / Data / UX / MVP. Send me an email.
The definitive guide to Ableton Live's delay compensation and reduced latency
(A small "Note to self" post, while producing music)
Two options are often misunderstood in Ableton Live: "Delay compensation" and "Reduced latency when monitoring". Even after watching many tutorials, blog articles, videos about this, it might still be unclear.
The best way to clearly understand what is going on is to do this small experiment (do it, it takes 2 minutes and you'll understand this once for all!):
Options > Delay Compensation
- 0: Start with a new empty project
- 1: Set Metronome ON
- 2: Put an audio Clip on Track 1 which is in perfect sync with the beats/metronome (e.g. a kickdrum on each beat)
- 3: Add 20 instances of Compressor with "Lookahead 10ms" (see bottom of the Compressor settings) on Track 1
- 4: Let's say playback is stopped
- 5: Put "Delay compensation" ON => Hit
<SPACE>key => there is an initial delay of 200ms (pay attention to it!), but then Metronome + Clip play in sync! -
6: Put "Delay compensation" OFF => Hit
<SPACE>key => the metronome plays immediately, but then the Clip arrives 200ms too late, out of sync!TL;DR: when Delay compensation is "ON", everything is in sync, the delays introduced by VSTs are compensated, but the price to pay is that everything is delayed (of 200ms in this example)! Redo steps #5 and #6 until you clearly hear the difference.
Options > Reduced Latency When Monitoring
- Repeat steps #0 to #5 from previous paragraph
- Add a second audio Track with Monitor set to "IN", armed for Recording, for example with your laptop's built-in mic, but leave this track empty with no audio effect/no VST
- Put "Reduced Latency When Monitoring" OFF (default) => Speak in the mic => You'll notice a 200ms delay between your voice and the Live monitoring playback!
-
Put "Reduced Latency When Monitoring" ON => Speak in the mic => You'll notice far less delay!
What happens here? When it is OFF, since Track 1 has to be delayed of 200 ms delay (because of the many Compressors!), ... then Track 2 is also delayed of 200ms, to keep everything in sync.
When it is ON, then Track 2 doesn't get delayed (it has no latency-generating effect/VST on the track after all!)... Less latency, which is good, but the price to pay is that Track 2 is now no more in sync with Track 1, hehe!TL;DR: You go to the cinema with a friend. Your friend is 10 minutes late. "Reduced Latency When Monitoring" OFF basically means "Ok I support my friend, wait for him, and enter the cinema 10 minutes late". "Reduced Latency When Monitoring" ON means "No way, I'm myself not late, why should I wait? Let's go in right now!"
"Keep Latency" buttons
This new Ableton Live 12 option seems pretty interesting, I haven't tested it yet. To be written.
Buffer Size, Input Latency, Output Latency, Driver Error Compensation, Overall Latency
This is documented everywhere, so I won't reexplain this in detail. About Driver Error Compensation, Overall Latency, see end of next paragraph.
Note on monitoring IN / AUTO / OFF setting
-
If you do a recording on a track with Monitor set to IN or AUTO, it will be shifted in time, and not in sync.
-
If you set Monitor to OFF, then it will be recorded in sync. See this Youtube video on this topic, and the Monitoring in Live article:
Why are my recordings out of sync? If the track monitor is set to "In" or "Auto" and you start recording, the recorded audio or MIDI is played back using the exact same timing and placement as what you've played. Depending on how large the buffer size or sample rate is, and how many latency-inducing devices are in the set, the recorded notes or audio could be offset in relation to the rest of the clips in the set. If you're playing in by hand then the difference is usually not so perceptible as the timing will already be quite loose in feel. However if you're recording from a fixed source (eg. a hardware synth playing a quantized pattern, or a drum machine) then the offset will probably be quite noticeable. In those cases we recommend setting the monitor to "Off" instead.
When the monitor is set to "Off" then Live compensates by offsetting the recorded material by the exact amount in the "Overall Latency" section in Audio preferences. -
To finetune this, start a new project, put metronome ON, on a track set to Monitor OFF, do a recording with the microphone to record the "click" of the metronome. If it's not perfectly in sync (example: I have a 28ms offset with my soundcard), then go to Options > Preferences > Audio > Driver Error Compensation and set it to 28ms. Then the reported "Overall latency" will increase (that's normal, it corresponds to the reality and allows a more accurate compensation!). Then the compensation will be perfectly accurate when recording in Monitor=OFF mode. Indeed, once again:
When the monitor is set to "Off" then Live compensates by offsetting the recorded material by the exact amount in the "Overall Latency" section in Audio preferences.
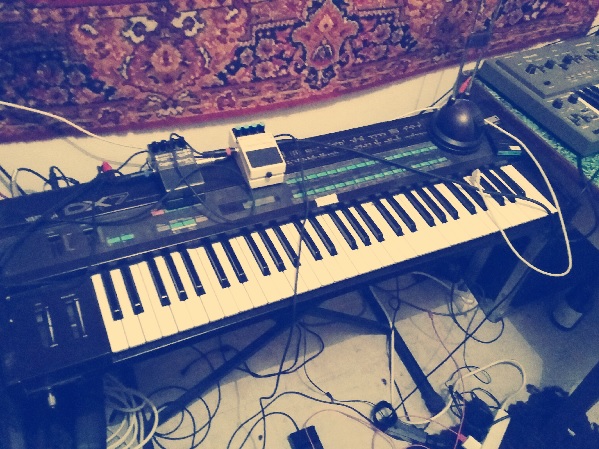
Why do I always have cables everywhere?
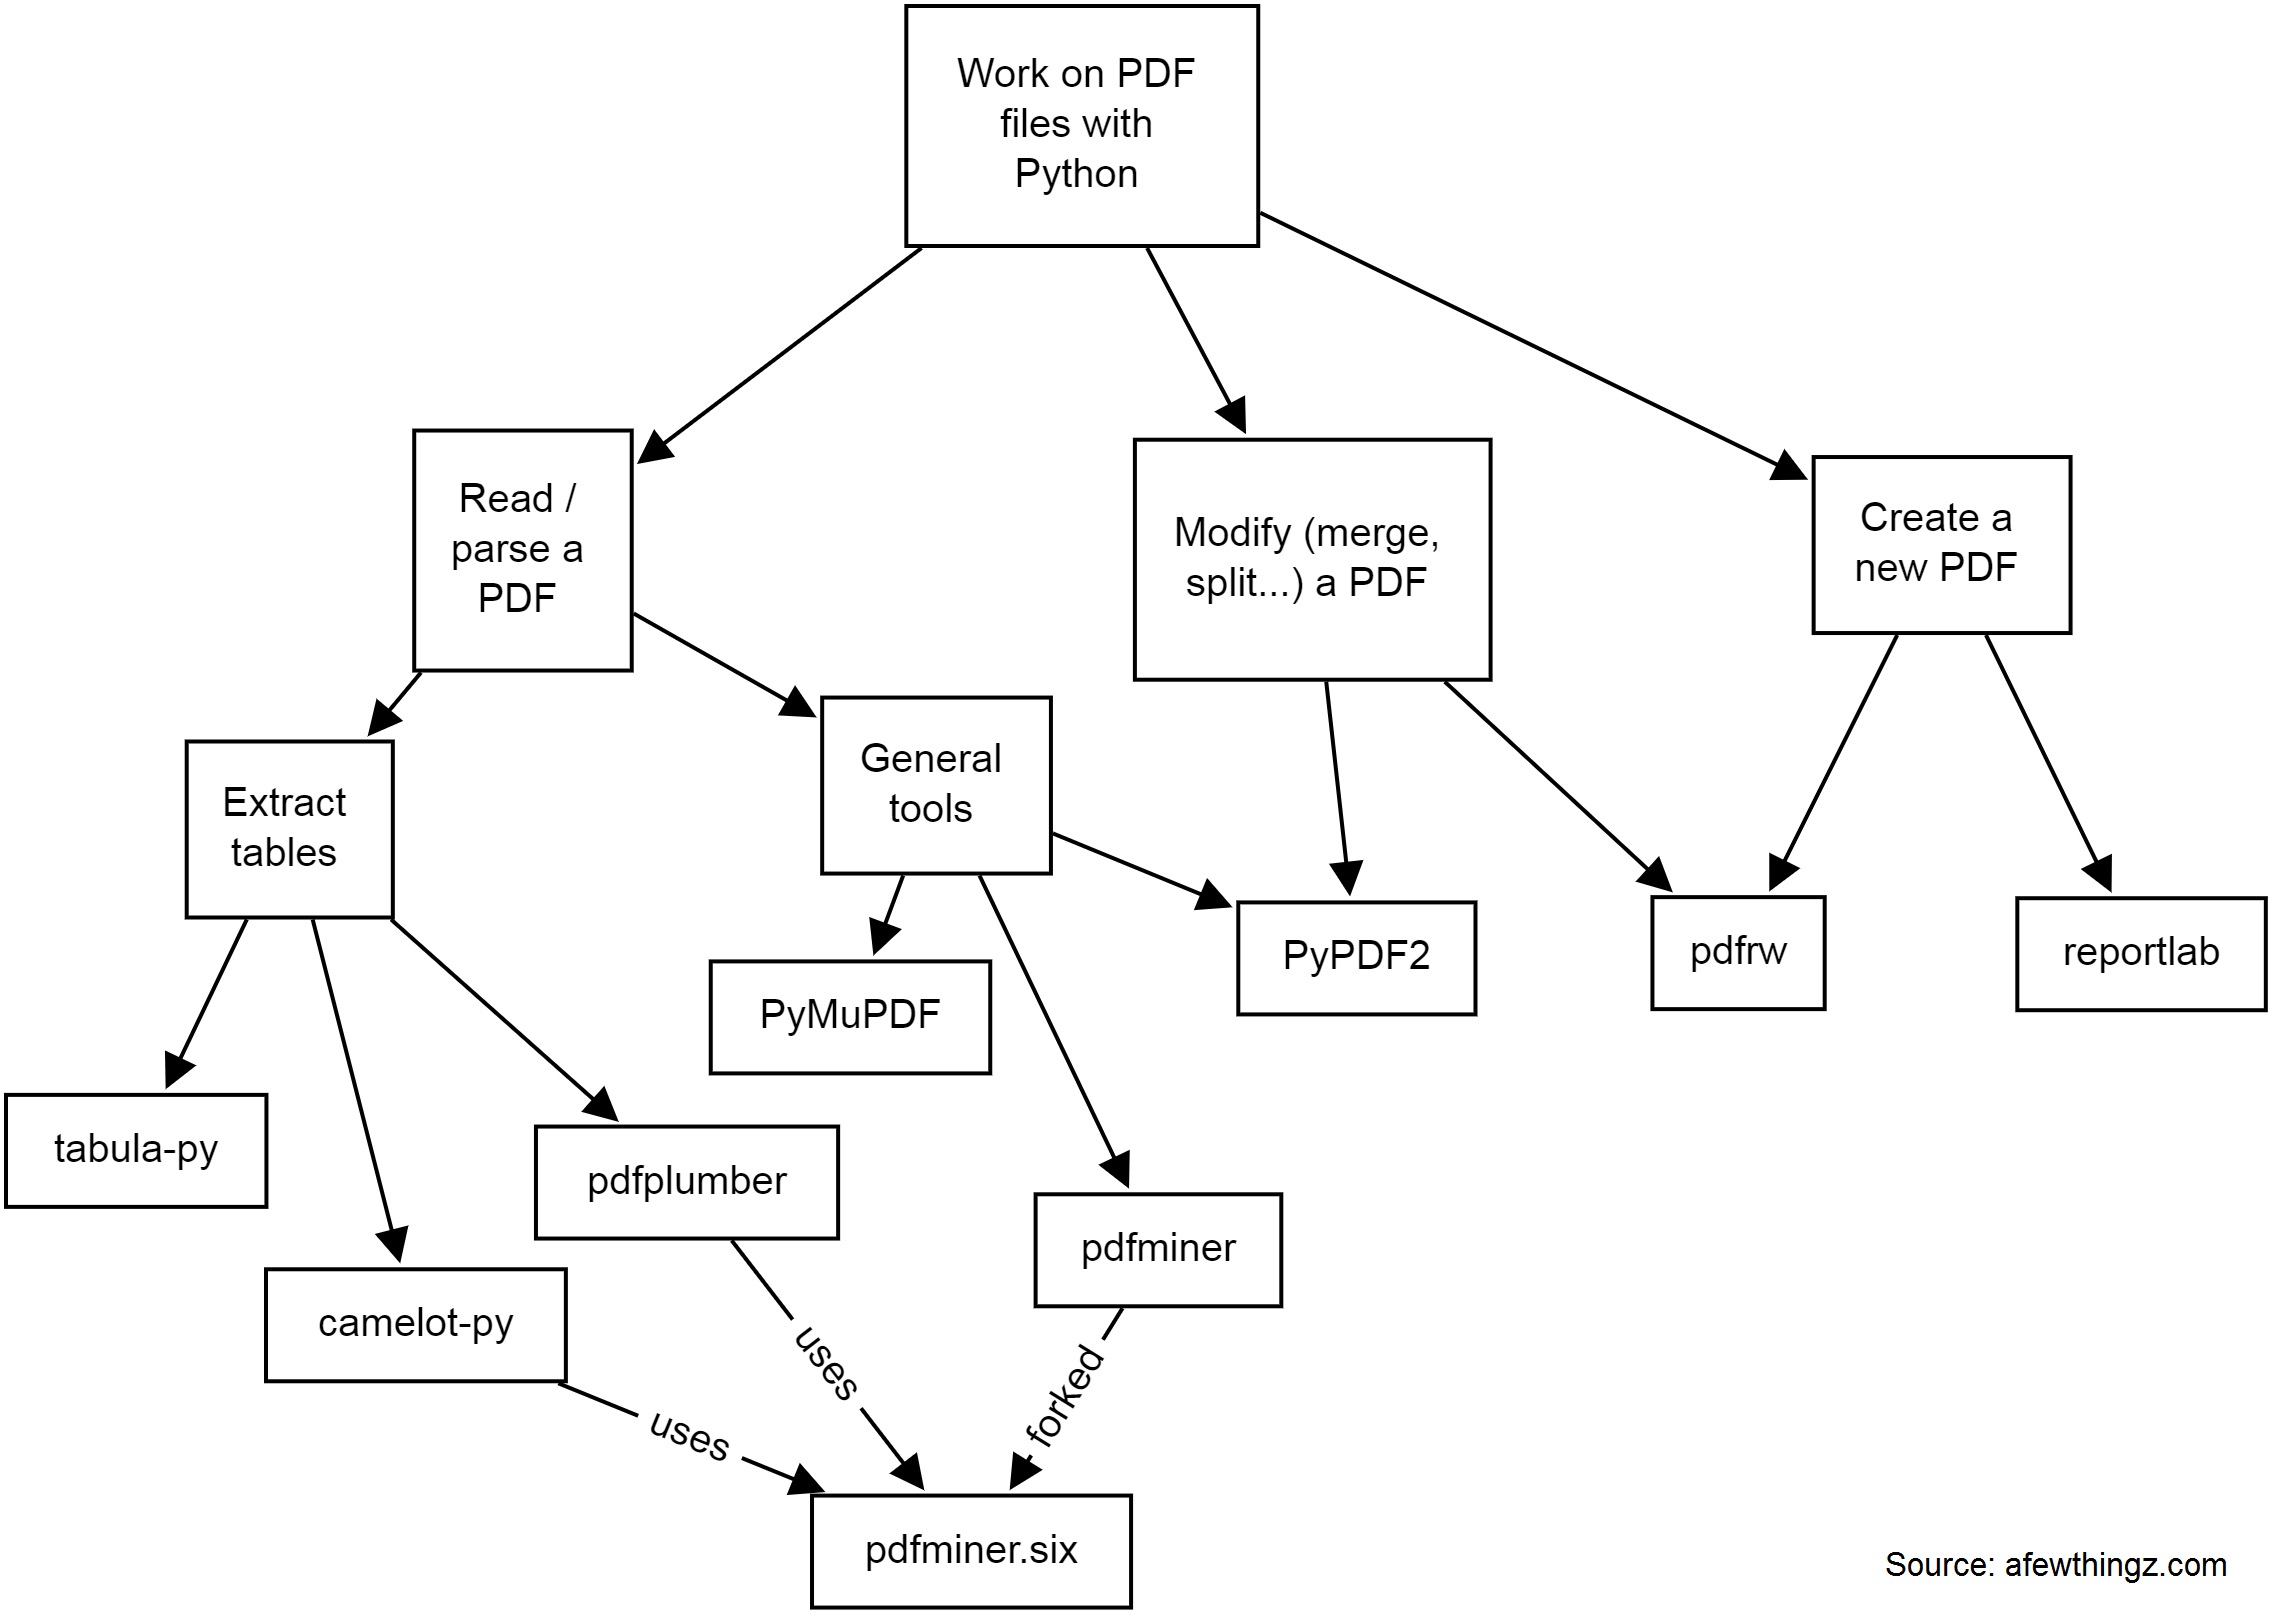
Working on PDF files with Python
There are many solutions to work on PDF files with Python. Depending on whether you need to read, parse data, extract tables, modify (split, merge, crop...), or create a new PDF, you will need different tools.
Here is a quick diagram of some common tools I have used:
-
PyPDF2 is a free and open-source pure-python PDF library capable of splitting, merging, cropping, and transforming the pages of PDF files. It can also add custom data, viewing options, and passwords to PDF files. PyPDF2 can retrieve text and metadata from PDFs as well.
-
pdfminerandpdfminer.sixPdfminer.six is a community maintained fork of the original PDFMiner. It is a tool for extracting information from PDF documents. It focuses on getting and analyzing text data. Pdfminer.six extracts the text from a page directly from the sourcecode of the PDF. It can also be used to get the exact location, font or color of the text.
-
pdfrw is a Python library and utility that reads and writes PDF files.
-
This is a software library that lets you directly create documents in Adobe's Portable Document Format (PDF) using the Python programming language. It also creates charts and data graphics in various bitmap and vector formats as well as PDF.
-
PyMuPDF adds Python bindings and abstractions to MuPDF, a lightweight PDF, XPS, and eBook viewer, renderer, and toolkit. Both PyMuPDF and MuPDF are maintained and developed by Artifex Software, Inc.
MuPDF can access files in PDF, XPS, OpenXPS, CBZ, EPUB and FB2 (eBooks) formats, and it is known for its top performance and exceptional rendering quality.
With PyMuPDF you can access files with extensions like .pdf, .xps, .oxps, .cbz, .fb2 or .epub. In addition, about 10 popular image formats can also be handled like documents: .png, .jpg, .bmp, .tiff, etc. -
tabula-py is a simple Python wrapper of tabula-java, which can read tables in a PDF. You can read tables from a PDF and convert them into a pandas DataFrame. tabula-py also enables you to convert a PDF file into a CSV, a TSV or a JSON file.
-
Camelot is a Python library that can help you extract tables from PDFs.
pdfplumberPlumb a PDF for detailed information about each char, rectangle, line, et cetera — and easily extract text and tables.
If you need to extract data from image PDF files, it's a whole different story, and you might need to use OCR libraries like (Py)Tesseract or other tools.
Have some specific data conversion / extraction needs? Please contact me for consulting - a little script can probably automate hours of manual processing in a few seconds!
N-dimensional array data store (with labeled indexing)
What am I trying to do?
I'm currently looking for the perfect data structure for an ongoing R&D task.
I need to work with a data store as a n-dimensional array x (of dimension 4 or more) such that:
-
(1) "Ragged" array
It should be possible that
x[0, 0, :, :]is of shape (100, 100), andx[0, 1, :, :]is of shape (10000, 10000) without wasting memory by making the two last dimensions always fixed to the largest value (10000, 10000). -
(2) Labeled indexing instead of positional consecutive indexing
I also would like to be able to work with
x[19700101000000, :, :, :],x[202206231808, :, :, :], i.e. one dimension would be a numerical timestamp in format YYYYMMDDhhmmss or more generally an integer label (not a continuous0...n-1range). -
(3): Easy Numpy-like arithmetic
All of this should keep (as much as possible) all the standard Numpy basic operations, such as basic arithmetic, array slicing, useful functions such as
x.mean(axis=0)to average the data over a dimension, etc. -
(4): Random access
I would like this data store to be possibly 100 GB large. This means it should be possible to work with it without loading the whole dataset in memory.
We should be able to open the data store, modify some values and save, without rewriting the whole 100 GB file:
x = datastore.open('datastore.dat')                              # open the data store, *without* loading everything in memory
x[20220624000000, :, :, :] = 0                                   # modify some values
x[20220510120000, :, :, :] -= x[20220510120000, :, :, :].mean()  # modify other values
x.close()                                                        # only a few bytes written to disk
Possible solutions
I'm looking for a good and lightweight solution.
To keep things simple, I deliberately avoid (for now):
- BigQuery
- PySpark ("Note that PySpark requires Java 8 or later with ...")
- and more generally all cloud solutions or client/server solutions: I'd like a solution that runs on a single computer without networking
| method | ragged | non-consecutive indexing | numpy arithm. | random access for 100 GB data store | notes |
|---|---|---|---|---|---|
xarray |
? | ✓ | ✓ | no | |
sparse |
? | ✓ | ✓ | no | |
Pandas DataFrame + Numpy ndarray |
✓ | ✓ | ? | ? | (*) (**) |
Tensorflow tf.ragged.constant |
✓ | ? | ? | ? | |
Sqlite + Numpy ndarray |
? | ? | ? | ? | to be tested |
(*) serialization with parquet: doesn't accept 2D or 3D arrays:
import numpy as np, pandas as pd
x = pd.DataFrame(columns=['a', 'b'])
for i in range(100):
    x.loc['t%i' % i] = [np.random.rand(100, 100), np.random.rand(2000)]
x.to_parquet('test.parquet')
# pyarrow.lib.ArrowInvalid: ('Can only convert 1-dimensional array values', 'Conversion failed for column a with type object')
(**) serialization with hdf5: currently not working:
import numpy as np, pandas as pd
store = pd.HDFStore("store.h5")
df = pd.DataFrame(columns=['a', 'b'])
df.loc['t1'] = {'a': np.random.rand(100, 100), 'b': np.random.rand(2000)}
store.append('test', df)
store.close()
# TypeError: Cannot serialize the column [a] because its data contents are not [string] but [mixed] object dtype
Contact me if you have ideas!
Links
Data structure for n-dimensional array / tensor such A[0, :, :] and A[1, :, :] can have different shapes
Pandas rows containing numpy ndarrays various shapes
Pandas Dataframe containing Numpy ndarray and mean
100GB data store: Pandas dataframe of numpy ndarrays: loading only a small part + avoid rewriting the whole file when doing small modifications
Python + TensorFlow + GPU + CUDA + CUDNN setup with Ubuntu
Every time I setup Python + TensorFlow on a new machine with a fresh Ubuntu install, I have to spend some time again and again on this topic, and do some trial and error (yes I'm speaking about such issues). So here is a little HOWTO, once for all.
Important fact: we need to install the specific version number of CUDA and CUDNN relative to a particular version of TensorFlow, otherwise it will fail, with errors like libcudnn.so.7: cannot open shared object file: No such file or directory.
For example, for TensorFlow 2.3, we have to use CUDA 10.1 and CUDNN 7.6 (see here).
Here is how to install on a Ubuntu 18.04:
pip3 install --upgrade pip   # it was mandatory to upgrade for me
pip3 install keras tensorflow==2.3.0

wget https://developer.download.nvidia.com/compute/cuda/repos/ubuntu1804/x86_64/cuda-ubuntu1804.pin
sudo mv cuda-ubuntu1804.pin /etc/apt/preferences.d/cuda-repository-pin-600
sudo apt-key adv --fetch-keys https://developer.download.nvidia.com/compute/cuda/repos/ubuntu1804/x86_64/7fa2af80.pub
sudo add-apt-repository "deb https://developer.download.nvidia.com/compute/cuda/repos/ubuntu1804/x86_64/ /"
sudo add-apt-repository ppa:graphics-drivers/ppa
sudo apt-get update
sudo apt install cuda-10-1 nvidia-driver-430
To test if the NVIDIA driver is properly installed, you can run nvidia-smi (I noticed a reboot was necessary).
Then download "Download cuDNN v7.6.5 (November 5th, 2019), for CUDA 10.1" on https://developer.nvidia.com/rdp/cudnn-archive (you need to create an account there), and then:
sudo dpkg -i libcudnn7_7.6.5.32-1+cuda10.1_amd64.deb That's it! Reboot the computer, launch Python 3 and do:
import tensorflow
tensorflow.test.gpu_device_name()     # also, tensorflow.test.is_gpu_available() should give True
The last line should display the right GPU device name. If you get an empty string instead, it means your GPU isn't used by TensorFlow!
Notes:
-
Initially the installation of CUDA 10.1 failed with errors like:
The following packages have unmet dependencies:
 cuda-10-1 : Depends: cuda-toolkit-10-1 (>= 10.1.243) but it is not going to be installed
on a fresh Xubuntu 18.04.5 install. Trying to install
cuda-toolkit-10-1manually led to other similar errors. Using asources.listfrom Xubuntu 18.04 like this one helped. -
I also once had errors like
Could not load dynamic library 'libcublas.so.10'; dlerror: libcublas.so.10: cannot open shared object file: No such file or directory. After searching this file on the filesystem, I noticed it was found in/usr/local/cuda-10.2/...whereas I never installed the 10.2 version, strange! Solution given in this post:sudo apt install --reinstall libcublas10=10.2.1.243-1 libcublas-dev=10.2.1.243-1. IIRC, these 2 issues weren't present when I used a Xubuntu 18.04, could the fact I used 18.04.5 be the reason? - Nothing really related, but when installing Xubuntu 20.04.2.0, memtest86, which is quite useful to test the integrity of the hardware before launching long computations, did not work.
Quick-tip: Rebooter une Livebox avec un script Python
Petite astuce utile pour rebooter une Livebox Play en 4 lignes de code :
import requests
r = requests.post("http://192.168.1.1/authenticate?username=admin&password=LEMOTDEPASSEICI")
h = {'Content-Type': 'application/json; charset=UTF-8', 'X-Context': r.json()['data']['contextID']}
s = requests.post("http://192.168.1.1/sysbus/NMC:reboot", headers=h, cookies=r.cookies)
Avec une Livebox 4 ou 5, voici la méthode :
import requests
session = requests.Session()
auth = '{"service":"sah.Device.Information","method":"createContext","parameters":{"applicationName":"so_sdkut","username":"admin","password":"LEMOTDEPASSEICI"}}'
r = session.post('http://192.168.1.1/ws', data=auth, headers={'Content-Type': 'application/x-sah-ws-1-call+json', 'Authorization': 'X-Sah-Login'})
h = {'X-Context': r.json()['data']['contextID'], 'X-Prototype-Version': '1.7', 'Content-Type': 'application/x-sah-ws-1-call+json; charset=UTF-8', 'Accept': 'text/javascript'}
s = session.post("http://192.168.1.1/sysbus/NMC:reboot", headers=h, data='{"parameters":{}}')
print(s.json())
Inspiré de ce post avec curl, de ce projet (la même chose en ... 99 lignes de code ;)) et la librairie sysbus.
NB: cette méthode de reboot change l'IP de la Livebox au redémarrage.
nFreezer, a secure remote backup tool
So you make backups of your sensitive data on a remote server. How to be sure that it is really safe on the destination server?
By safe, I mean "safe even if a malicious user gains access" on the destination server; here we're looking for a solution such that, even if a hacker attacks your server (and installs compromised software on it), they cannot read your data.
You might think that using SFTP/SSH (and/or rsync, or sync programs) and using an encrypted filesystem on the server is enough. In fact, no: there will be a short time during which the data will be processed unencrypted on the remote server (at the output of the SSH layer, and before arriving at the filesystem encryption layer).
How to solve this problem? By using an encrypted-at-rest backup program: the data is encrypted locally, and is never decrypted on the remote server.
I created nFreezer for this purpose.

Main features:
-
encrypted-at-rest: the data is encrypted locally (using AES), then transits encrypted, and stays encrypted on the destination server. The destination server never gets the encryption key, the data is never decrypted on the destination server.
-
incremental and resumable: if the data is already there on the remote server, it won't be resent during the next sync. If the sync is interrupted in the middle, it will continue where it stopped (last non-fully-uploaded file). Deleted or modified files in the meantime will of course be detected.
-
graceful file moves/renames/data duplication handling: if you move
/path/to/10GB_fileto/anotherpath/subdir/10GB_file_renamed, no data will be re-transferred over the network.This is supported by some other sync programs, but very rarely in encrypted-at-rest mode.
-
stateless: no local database of the files present on destination is kept. Drawback: this means that if the destination already contains 100,000 files, the local computer needs to download the remote filelist (~15MB) before starting a new sync; but this is acceptable for me.
-
does not need to be installed on remote: no binary needs to be installed on remote, no SSH "execute commands" on the remote, only SFTP is used
- single .py file project: you can read and audit the full source code by looking at
nfreezer.py, which is currently < 300 lines of code.
More about this on nFreezer.
By the way I just published another (local) backup tool on PyPi: backupdisk, that you can install with pip install diskbackup. It allows you to quickly backup your disk to an external USB HDD in one-line:
diskbackup.backup(src=r'D:\Documents', dest=r'I:\Documents', exclude=['.mp4'])Update: many thanks to @Korben for his article nFreezer – De la sauvegarde chiffrée de bout en bout (December 12, 2020).

 twitter
 email
email github
 linkedin
 freelancing